Posts in Category: software
Ethoscopy and Ethoscope-lab
- Ethoscopy is Python software for analysis of ethoscope data – and more! – created by Laurence Blackhurst
- Ethoscope-lab is a pre-baked Docker container featuring an installation of the multi user Jupyter Hub with Python and R kernels, ready to be used with Ethoscopy and Rethomics.
Why using ethoscope-lab?
Let me simply explain how we use it in our lab. We arranged a powerful workstation that acts as lab server and run a dockerized ethoscope-lab on it. The workstation has a local copy of all our ethoscope data (about 8 Terabyte as I type) and ethoscope-lab has local access on those, offering the quickest loading time. Users can then use their computer, or tablet to connect to the workstation and perform data analysis directly from the browser. The setup frees them from working at their desk and allows access to their data from anywhere in the world, guaranteeing at the same time the fastest computational performance even when they work on their laptops. Moreover, the system uses Jupyter notebook as default, meaning each analysis can be nicely annotated and exported to be shared with the world post-publication, along the original raw data.
To give a practical example: this series of repositories on zenodo contains the entire dataset of our latest paper (316Gb) and it’s paired to all the notebooks we used to generate each figure. Readers can download the dataset freely, install ethoscope-lab as docker container on any computer (irrespective of the operating system they adopt) and reproduce all our analyses!
Video tracking and analysis of sleep in Drosophila melanogaster
Nat Protoc. 2012 Apr 26;7(5):995-1007.
Video tracking and analysis of sleep in Drosophila melanogaster.
Giorgio F. Gilestro
In the past decade, Drosophila has emerged as an ideal model organism for studying the genetic components of sleep as well as its regulation and functions. In fruit flies, sleep can be conveniently estimated by measuring the locomotor activity of the flies using techniques and instruments adapted from the field of circadian behavior. However, proper analysis of sleep requires degrees of spatial and temporal resolution higher than is needed by circadian scientists, as well as different algorithms and software for data analysis. Here I describe how to perform sleep experiments in flies using techniques and software (pySolo and pySolo-Video) previously developed in my laboratory. I focus on computer-assisted video tracking to monitor fly activity. I explain how to plan a sleep analysis experiment that covers the basic aspects of sleep, how to prepare the necessary equipment and how to analyze the data. By using this protocol, a typical sleep analysis experiment can be completed in 5-7 d.
pyREM: a crowd trained machine learning approach to automatic analysis of EEG data
pyREM: a crowd trained machine learning approach to automatic analysis of EEG data
Quentin Geissmann, and Giorgio F Gilestro
EEG data are at the basis of a plethora of neuroscientific questions: from sleep to consciousness and attention, many aspects of neuroscience heavily rely on electrophysiological correlates of brain activity. Yet, EEG analysis heavily relies on subjective scoring and interpretation to the point that many neuroscientists consider it an art, more than a systematic tool.
Can we teach this art to a computer?
Attempts at creating an objective way of scoring EEG data have been less than perfect so far, mainly because humans are reluctant about trusting the judgement of a machine, programmed according to hard-coded values and thresholds.
pyREM aims at solving this issue, using a machine learning approach to automatically analyse EEG data. pyREM learns how to classify EEG directly from humans, mimicking all the human’s principles and criteria without any apriori knowledge of what an EEG means. The overall goal of the project is to teach pyREM how 1, 10, 100 or 1000 laboratories score EEG so that the software will be able to automatically grasp and isolate the key fundamental criteria and become, in this way, the universal scorer.
If you are a laboratory interested in being part of this, please get in touch.
If you want to know more, you can
- read pyrem_poster
- read an early draft of the manuscript
- read the pyREM documentation
- get in touch!
Ethoscopes: An Open Platform For High-Throughput Ethomics
PLOS Biology, 19 Oct 2017; 15(10): e2003026
Ethoscopes: An Open Platform For High-Throughput Ethomics
Quentin Geissmann, Luis Garcia Rodriguez, Esteban J. Beckwith, Alice S. French, Arian R Jamasb, and Giorgio F Gilestro
We present ethoscopes, machines for high-throughput analysis of behaviour in Drosophila and other animals. Ethoscopes provide a software and hardware solution that is reproducible and easily scalable. They perform, in real-time, tracking and profiling of behaviour using a supervised machine learning algorithm; can deliver behaviourally-triggered stimuli to flies in a feedback-loop mode; are highly customisable and open source. Ethoscopes can be built easily using 3D printing technology and rely on Raspberry Pi microcomputers and Arduino boards to provide affordable and flexible hardware. All software and construction specifications are available at http://lab.gilest.ro/ethoscope.
Supplementary material.
Supplementary material 1 – webGL model of the ethoscope.
Supplementary material 2 – instruction booklet for the LEGOscope.
Supplementary material 3 – instruction booklet for the PAPERscope.
Supplementary Video 1 – Introduction to the ethoscope platform.
Supplementary Video 2 – The optogenetics component of the optomotor in action.
Featured in:
- 3-D–Printed Ethoscopes Lower Barriers to Large-Scale Fly Behavior Studies – The Scientist
- 3D printed device studies the life of flies for a better understanding of AI – 3Dprintingindustry.com
- Ethoscope – MagPi (the official Raspberry PI magazine)
- Apparently Fruitflies like a Raspberry PI – Hackaday.com
- DIY goes in vivo – LabAnimal
Can your lab book do this?
When I was a student I used to be a disaster at keeping lab books. Possibly because they weren’t terribly useful to me since back then I had an encyclopedic memory for experimental details or possibly because I never was much of a paper guy. As I grew older my memory started to shrink (oh god, did it shrink!), I started transforming data into manuscripts and as a consequence I began to appreciate the convenience of going back 6 months in time and recover raw data. Being a computer freak, I decided to give up with the paper lab book (I was truly hopeless) and turned to digital archiving instead. As they say, to each their own!. Digital archiving really did it for me and changed enormously my productivity. One of the key factors, to be honest, was the very early adoption of sync tools like Dropbox that would let me work on my stuff from home or the office without any hassle.
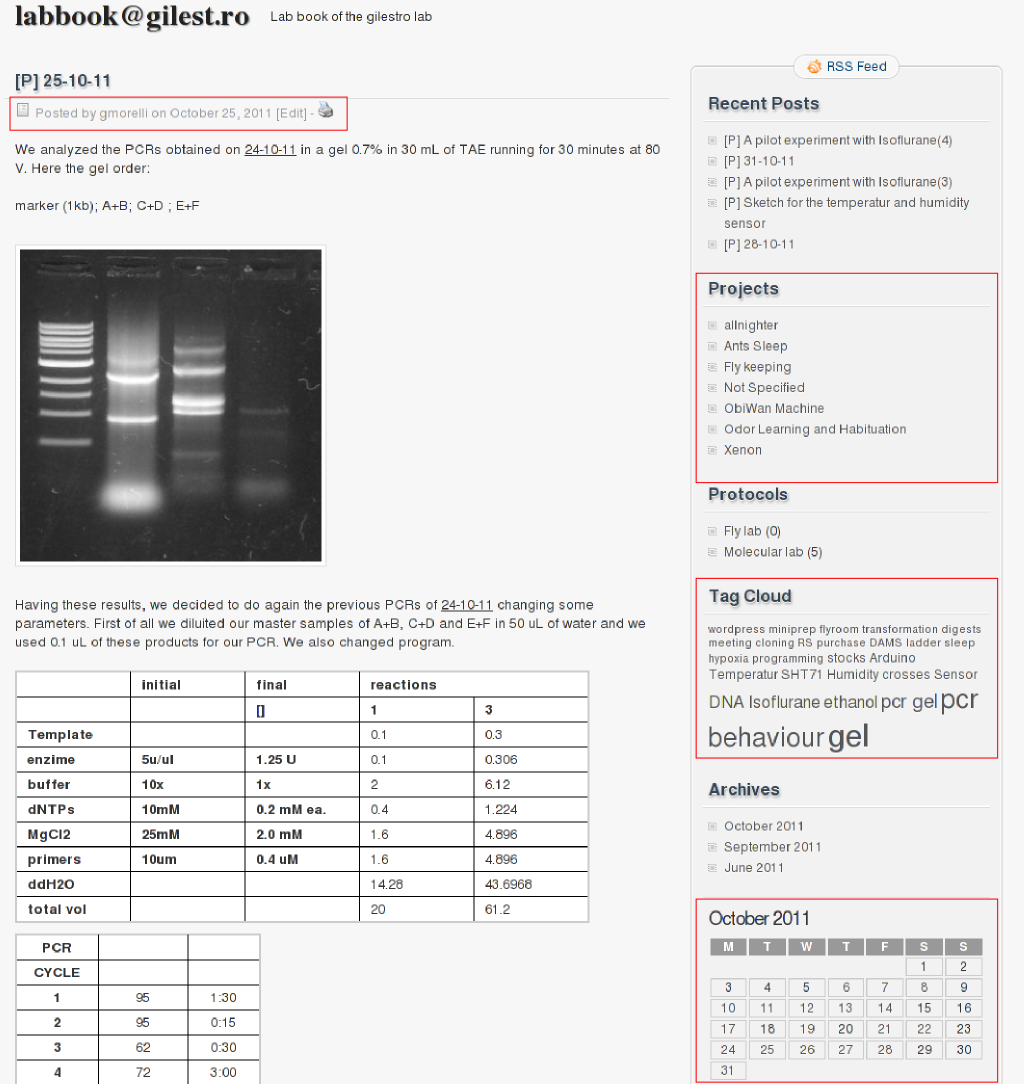
As soon as I started having students, though, I realized that I needed a different system to share data and results with the lab. After a bit of experimentation that led nowhere, I can now finally say I found the perfect sharing tool within the lab: a blog content manager promoted to shared lab book (here). This is what it looks like:
This required some tweaking but I can say now it works just perfectly. If you think about it, a blog is nothing less than a b(ook) log and so what better instrument to keep a lab book log? Each student gets their own account as soon as they join they lab and day after day they write down successes and frustrations, attaching raw data, figures, spreadsheets, tables and links. Here some of the rules and guidance they need to follow. Not only can I go there daily and read about their results on my way home or after dinner, but I can quickly recall things with a click of the mouse. Also, as bonus, all data are backup’d daily on the Amazon cloud and each single page can be printed as PDF or paper if needed. As you can see in the red squares in the above picture, I can browse data by student, by day, by project name or by experiment. That means that if I click on the name of the project I get all the experiments associated to it, no matter who did them. If I click on a experimental tag (for instance PCR) I get all the PCRs run by all the people in the lab.
Except for the protocols, all contents are set to be seen only by members of the lab. However, inspired by this paper, I decided that the project will be then flagged as public as soon as the results will be published.
Patches for Nautilus “move to trash” bug
Warning, this post contains a geek rant.
If you use the nautilus or nautilus-elementary filemanager (the default file manager in any gnome-based linux distro, including Ubuntu), you are probably aware of the annoying bug with file deletion.
Like any other file manager, nautilus allows you to delete your files using keyboard shortcuts: permanently (hit <Shift-Delete>) or temporarily by moving them to the trashbin (hit <Delete> on your keyboard). Removing files is always a critical action so any other file manager will make sure that you don’t do it accidentally: the file manager in MacOS, finder, will require you to hit the key combination <AppleKey+Delete>, difficult to perform by mistake. Microsoft Explorer, Konqueror, Thunar and many others will ask you to confirm that you really want to trash files with a dialog box.
Unfortunately nautilus lacks this ability: if you, your toddler or your cat accidentally hit the Delete key on the keyboard while a file or folder is selected, they go into the trashbin without warning. If you are not looking at the screen while this happens, the item is well gone. Obviously, this flaw was pointed out already long time ago. Users started asking for a fix already in 2004 (that is seven years ago!) and lots of people wanted to get that fixed: see for instance here, here, here, here, here, here…
Surprisingly, reactions of the gnome developers to this problem were of two kinds: “I don’t think this is a real problem”[¹] or “I don’t think you are proposing the perfect solution”[²]. Back in 2009, I accidentaly lost some file and wrote a patch to fix this bug. The patch simply gave the user the option to activate a warning dialog if they wanted to. I figured “people who want the dialog will enable it and be happy, people who don’t will leave it alone and keep discussing about what is really truly the best solution for the next 7 years“. Believe it or not, the problem still exists, so I thought of raising the issue once again (this time, I also proposed a patch to change Delete in Control-Delete).
Guess what: even after 7 years and hundred of people begging for a fix, we are sitting on the same attitude:
This is a real problem, but I don’t think the solution is a windows-like alert dialog. […] An animation with the file becoming red and/or flying to the trash would be a nice addition.
Or maybe a small cluebar with an embedded undo button would already be enough. I like how Google does it in its webapps.
What if deleted files were visible as some ghost-like-icon in the directory they used to be? And it could be possible to turn on/off the visibility of deleted files? And you can have your animation then as well; of an icon that dies.
I think your use case is a real concern, and something we should fix indeed, but as others said in this thread, I don’t think a confirmation dialog is how we want this to be implemented, especially when it carries a new preference with it.
Personality i like my delete and it would felt awkward if the delete didn’t delete anything.
We will rather keep the hole than having a solution we don’t like. Little does it matter if any other browser is actually using that solution or if lots of people want to see the thing fixed.
This attitude is amazingly complicated to understand for my simple brain. For me, getting things done means finding the meeting point between the optimal solution and the best outcome. If my car gets a flat tire on the way, I will accept any new tire a rescuer would give me and I won’t be sitting 7 years waiting for one that really matches the other three. And I like to think this is not Linux true philosophy either.
Anyway, here you can download the patches to fix this issue.
- Fix à la Microsoft/Konqueror/Thunar, will ask for a confirmation upon deleting a file (Nautilus – Nautilus Elementary).
- Fix à la Finder/MacOS, changes Delete to Control+Delete (Nautilus – Nautilus Elementary).
I am using the second one on nautilus-elementary (which also sports a very convenient Undo feature).
Edit 1 April 2011. To much of my pleasure, the patch has now been accepted and from next version on, Control<Delete> will be the shortcut to send stuff to trash. No more accidental deletions! Open Source wins again.
Edit June 2011. If you arrive to this page because you freaked out finding the new nautilus behaviour, this is how to get back to the old key combo
Notes:
1. You are all familiar with the “how many people it takes to change a light-bulb?” jokes.
The one about software developers goes like this:
Q: How many developers does it take to change a lightbulb?
A: The lightbulb works fine on the system in my office. NOT REPRO.
2. The one about C++ programmers goes like this:
Q: How many C++ programmers does it take to change a lightbulb?
A: You’re still thinking procedurally. A properly-designed lightbulb object would inherit a change method from a generic lightbulb class, so all you’d have to do is send it a bulb.change message.
Nike4All – Upload your Nike+ data to the official Nike+ website.
After a couple of days of hacking, I managed to get a way to upload the data from Nike+Ipod device to your Nikerunning account. No iTunes needed! That is quite cool considering that the Nike+ Ipod Sport kit has been out for a while (2006 according to wikipedia) and linux users had no way to sync their runs without iTunes. Until now.
Installation.
Simply download the python script from here. It’s a single file and all it requires is Python (was tested with 2.5 and 2.6 – should work also with 3.0). You can place the script wherever you want. It is suggested to save the script in /usr/bin so that you can run it without typing the path everytime.
GUI.
A graphical interface is also available, as Screenlet. Get it here.
First time run – pairing your data with your account.
1. If you don’t have one yet, create an account on the Nike+ website. You will be asked for an email address, password, personal details and, at the end, for a screenname. Just go throughout the entire registration. If you already have an account on the site, skip this step.
2. Make sure you are not logged in into your Nike+ account (hit logout).
3. Start nike4all issuing the following command:
gg@fly-home:$ nike4all.py -createAccount

Go to this URL and login whit username and password of the account you just created

Url to visit: http://www.nike.com/nikeplus/?token=xxxxxxxx-xxxx-xxxx-xxxx-xxxxxxxxxxxx&v=2

Press enter to continue only AFTER you login
4. After a few seconds you will be asked to visit a website: simply open that URL in your favourite browser and login using your credentials. Edit [28.02.11]: it seems Chrome may cause some troubles at this step. If it doesn’t work please use another browser; Firefox should do it.
5. After having done so, go back to the command line and hit Enter. The program will then say:
Congratulation, your status is now confirmed

The user <screenName> is now associated to the pin xxxxxxxx-xxxx-xxxx-xxxx-xxxxxxxxxxx

Your pin was successfully saved in the configuration file

To update new files connect the iPod and use the following command:

nike4all -sync
The configuration file is in your home folder and it is called
.nike+rc
the running files you will be syncing will also be backup in the same folder
~/nike+
you can change the backup folder by editing the configuration file with your favorite text editor.
Usage.
You should already know by now.
Other than regular syncing, you can also upload specific files. Start the program without parameters to get a help message.
Caveats and technicalia.
If you already have a Nike+ account, you can still use that one. You existing data will not be lost but you may experiencing problems syncing with iTunes again in the future because your PIN was changed. Your iTunes PIN is stored on your iPod, encrypted (probably with AES CBC 128 bit) in a plist file. Maintaining the same PIN for iTunes and nike4all would require finding that password.
Please, do not use the nikerunning website with any other device that is not an iPod or a sportband. The nikerunning website is a service for Nike customer only and nike4all shall be seen as a tool that allow linux users to use this wonderful service.
License and Credits.
As usual, thanks to python and thank to Ubuntu. Nike4all was developed using only free software and it is released under GPL. If you like the software, please consider donating using the button on the right side – money will go into a research fund (the Institute of garage science).
Bugs and history.
If you find a bug, please drop me an email.
08/15/2009 – first release v0.1
Update (July/2010)
Masatoshi Kanzaki has published a similar tool to upload Nike+ Sport band data from linux! Get it on his blog.
Update (October/2010)
I uploaded the sourcecode on googlecode. Feel free to contribute or fork.
Videocapture for linux
If you did some hacking with a webcam and python, you probably ended up using the Videocapture module by Markus Gritsch. Unfortunately, the module does not work on any operative system other than windows, which could be a problem if you wish to make your application platform independent. So, here you will find a linux version of Videocapture. It has been tested on ubuntu distributions. It will run as long as you have installed
- python 2.5 (maybe others too)
- PIL – the python imaging library
- opencv
You can download it here. Some functions are actually not active (namely those that would call the configuration panels). It should work on mac too. Please, if you try it on a mac, let me know how it went.
Enjoy.
WinGooglizer
 If you are a Linux user you probably already know and appreciate that (amazingly) simple piece of software that is googlizer. If you don’t know what I am talking about: googlizer is a tiny gnome applet that sits in your taskbar; everytime you click on it, it will start a google search using the text in your clipboard as query. Just select the text using your mouse to copy it in the clipboard, then click on the G icon of googlizer and voila, your google search is already waiting for you in your favorite browser.
Being myself a ubuntu user I love the googlizer but sometimes I need to work on computers running windows OSs. I decided to invest 20 minutes of my time (while waiting the confocal to do its work) to make a windows clone of Googlizer.
You can dowload it from here (it’s free, as in free beer of course). To completely emulate X copy&paste functions you may want to consider using True X-Mouse Gizmo as well.
Is written in Python then compiled to exe using py2exe and the installer is build using Inno Setup. In case you are interested in the source, here you’ll find the python code for wingooglizer, the py2exe setup file and the iss inno script.
WinGooglizer works fine on windows xp, sp3. I guess it will work on any Windows OS. Enjoy and let me know how it works for you.
Journal Filtered Pubmed
| PubMed | |||
|
|
|||
| Cell | Nature | Science | |
| PLOS Biol | PLOS ONE | PNAS | |
| Neurobiology Journals | |||
| Neuron | Nature Neuroscience | J. of Neuroscience | |
| Nature reviews in Neuroscience | Trends in neurosciences | ||
| Development and C.B. Journals | |||
| Development | Genes and Development | Current Biology | |
| Nature Cell Biology | Developmental Cell | J Cell Biol. | |
| Embo Journal | J Biol Chem. | ||
| Genetics and Medicine | |||
| PLoS Genet. | Nature Genetics | ||
| Immunology Journals | |||
| Immunity | Blood | Nature Immunology | |
| J. of Immunology | Immunology | ||
|
Instruction From this page you can easily interrogate the PubMed database by restricting your queries to only certain journals. This feature is not available on the Pubmed site. Check the box next to the group category to include all the journals belonging to that category or select the journals one by one. |
|||


